Showing posts with label IKEA. Show all posts

Tuesday, December 10, 2013

I wanted that tree!!

Who knew that a piece of fabric could put me on a mini emotional roller coaster. Before you go on this ride with me, I'll share the end result.


It just took a little bit for me to get things this way. Here's what happened...

About a month ago, while reading some blogs, I came across a picture of a fabulous couple of yards of fabric from IKEA of a Christmas tree.  I fell in love. (See what I saw here...) But, IKEA doesn't sell this fabric anymore.

However, upon further searching and googling (I was hoping something similar might exist) I realized that IKEA had a different type of canvas tree this year. It was $12.99 for the entire thing...and it glowed in the dark! But there was just one problem. I had gone to IKEA the week before. And another trip to Atlanta was not in my immediate future (especially not another trip before Christmas).

Thank goodness my sister was going though! But the day she was going to IKEA, they removed the tree from their website. However, there were still a few in stock! She picked up the magical canvas tree for me!

As soon as she brought it by the house, I took it out of its packaging and into a dark room. Yep! It glowed in the dark!


After picking up some 5 foot PVC pipes, the tree was hung in my hallway.


I had loved the original idea of making this tree into an advent calendar, but I wasn't quite ready to do anything permanent yet. So, like any good hoarder of craft supplies, I raided the guest room closet to see what I had on hand.


I also remembered a felt heart garland I had picked up at the Dollar Tree back in February. Using safety pins, I attached the garland to the tree.


Next, I cut some styrofoam balls in half and wrapped them in strips of fabric. These also were attached to the tree with safety pins. Some stars cut out of brown cardstock got taped into place.


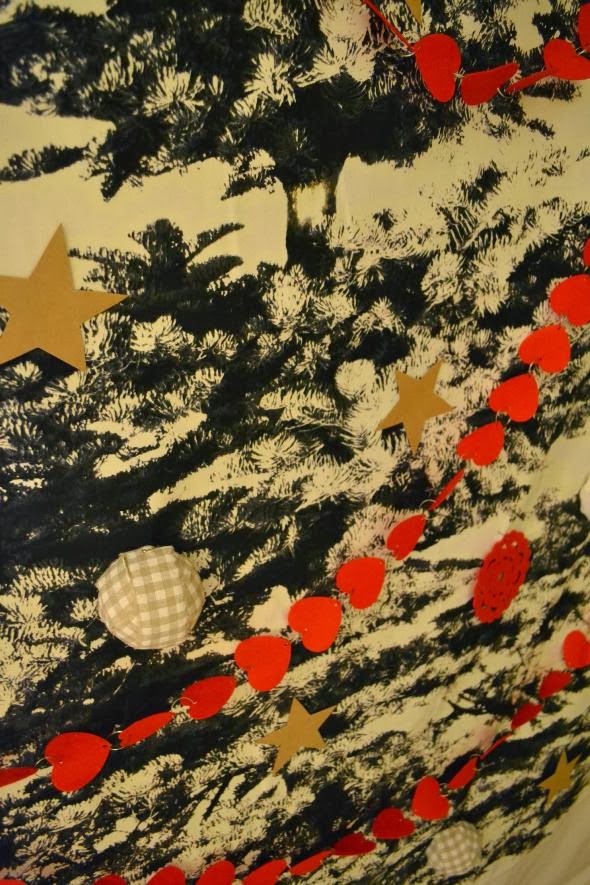
 Dollar Tree also recently had packs of felt coasters. A set of four red ones made adorable ornaments.


Last but not least, I needed a topper. I tried a few different things, but in the end, I settled for a flag cut from cardstock.


It seemed different, yet fitting since the tree had a very long skinny top.


I am enjoying my festive little hallway. And I think it pairs nicely with my gift box wreath. Even if I had not had the decorations on hand, this project still would have cost me less than $20.

I must admit that there was one more mishap with this little tree. As I was snapping the last photo, the whole thing came crashing down. Apparently, one strand of twine was not enough to hold this beauty. My husband helped me secure it more permanently.


So, a word to the wise...if you hang something this way, use a couple strands of twine!

And, it seems there are a few of these trees on Ebay and Amazon...or you may find one on the shelves at an IKEA store. I am glad that my sister helped me to snag one! It's a fun addition to my Christmas decor. 

Tuesday, September 11, 2012

Let's Decorate the Nursery!!

It's a boy!! (If you missed our gender reveal video, or if you just want to watch it again, you can see it here.)

I've always loved to look at the ideas featured on Lay Baby Lay.  And I always knew that when the time came, I wanted to create a mood board much like she does. She also has great tips for planning what to put in a nursery.


Before we knew the gender, we had decided on girl names, but couldn't agree on any boy names. BUT...I had more boy nursery ideas. I knew that if it was a boy, I wanted the room to be something that could easily grow with our little guy. I wanted it to have very boy elements in it, but also contain classic, manly items. I originally thought I would use grass green and navy and white (kinda like a man's necktie).

But, I 've changed my mind...I found a few inspiration pictures of nurseries containing tans and browns, grays and oranges. And I fell in love. I want the room to have a rustic feel. Not like, go climb a tree and live in the wilderness, but containing industrial/hardware store items. I've already got a good little pile of decorations accumulating in our designated nursery. And I have an even bigger pile of projects that I would love to complete for the room.

So far, here's my little mock-up mood board of some of my ideas.


  1. I'm on the hunt for a round wire basket to convert into a shade for the overhead light. 
  2. Jeremiah is going to make some mock barn doors for one of the walls. 
  3. The walls are already a great shade of tan - we plan to paint a 2 foot stripe around the entire room in white. 
  4. The curtain rod will be made out of plumbing pipes. And the curtains will be fashioned for ordinary canvas drop cloths. 
  5. The crib is getting painted an awesome shade of brown/gray. (Darker than this picture). The changing table will be the same color. My mother-in-love is going to help me make some great, modern bedding to accompany white crib sheets. You can expect to see orange patterns in the fabric. 
  6. On the hunt for a wooden rocking horse. How cool if it would look great painted orange. 
  7. Registered for this awesome, tall basket from Target that will be perfect for toy storage. 
  8. I love the softness of a sheepskin rug.  I may put a few of these cheap faux ones from IKEA together. 
  9. On the hunt for a plastic-y set of deer antlers to paint orange. 
  10. I will definitely use peg board. 
  11. Wire baskets. I'll take as many as I can get my hands on. 
  12. Loving this glider from Target, but I will need to settle for something cheaper. Just dreaming...And I will whip up a pillow that matches the bedding. 
  13. Love these square baskets from IKEA
  14. They fit perfectly into this bookshelf from IKEA. Someday, I'll make a cushion for the top of the shelf - making it into a bench. I figure this will be great for baby storage now, and toy/book storage later. 
I've got a few more projects up my sleeve. And I am not set in stone about the items pictured above. I am, however, set on the colors and the hardware store/industrialish theme. Now I just have to begin collecting the elements. And I hope to collect them cheaply!

I am still on the hunt for a dresser as well. I am hoping for something with very plain lines. And I have some other plans for what to hang on the wall (If you know me, you know I hate a blank wall). 

We have until January for all this to come together, but some days, I just like to dream about all my ideas...


Wednesday, February 22, 2012

A Little Pantry Makeover

When we moved into our new home in July, I was so excited about certain features of our new home. One of my favorite places was the kitchen pantry! Finally, I had a place to store our food in an organized, out-of-the-cupboards way.

But almost 7 months later, I was getting a little frustrated with the beloved pantry.


The shelves, although roomy are extremely deep. I had put a lazy-susan on one shelf to help with my spice containers.

But overall I had a hard time seeing just what I had on hand.  The poor top shelf was just a pile. 

It was time for a change – so, we took a trip to IKEA (my go-to place for all organizational needs). We measured the pantry, being careful to write down all the dimensions. I like to know all the details before exploring our options. I also entered the magical land of IKEA with an open mind. I wasn’t tied down to only looking at kitchen solutions. Most of IKEA ‘s products can be used for multiple functions. On this trip, I also purchased some recycling containers that I plan to use in a totally different way in our basement

My husband loves the display floor at IKEA – Jeremiah, being the curious guy that he is, opens all drawers, cupboards and cabinets. Eventually, in the closet section, we found the perfect solution.

The ANTONIUS shelving unit fit our pantry measurements exactly. The frame for the 4 drawer structure was only $9.99. There were two different options for drawers – plastic bins or wire baskets. I chose the wire baskets so that I could easily see what was in each drawer. The baskets were $2.50 each.


We removed one of the shelves from the pantry, and my husband quickly assembled the shelving unit.
It was a perfect fit.


Now it was time to reorganize our food. My kitchen counters were piled high with pantry items.


Although my counters looked like a grocery store conveyor belt, it was the perfect opportunity to sort and rethink placement in the pantry. 


The baskets, even though they are made for clothes closets, were the perfect sizes. Cake mix boxes on their side fit.


Spice containers stand easily in the basket – I may be adding some easy to read labels to the top of the containers.


After packing the baskets, I was sad to pile up all the leftover foods on that huge top shelf. There had to be another way. Jeremiah put in another shelf for me, maximizing the space at the top of the closet. Much better!


It was the perfect amount of space to store my coupon stock of ranch and mustard.

I had previously purchased a few other items that made the pantry super functional. My pot lid hanger from IKEA screwed to the door works perfectly. In our previous apartment, I had this on the inside of a cabinet door. Sad to say, I do not think IKEA sells this any more. But I'm sure there are other similar solutions out there.


Next to my pot rack is a simple wreath hook -  I purchased it at Dollar General a while back when Christmas items were 90% off. 10 cents for an over the door hook that holds my aprons and sometimes lunchboxes.


To hold my plastic bags, IKEA has an inexpensive solution. RATIONELL VARIERA comes in multiple colors for just $1.99.


I was pleased with the transformation, but still needed a solution for my cans.


 Walmart had pop can organizers for just $5.97. I purchased 2, stacking them to the right of the shelving unit.


I placed the larger cans on the top.


To finish the pantry and add a decorative element, I decided to attach some labels to the wire drawer.


 I am obsessed with the $1 section at Michael’s – They had adorable vintage looking frames. The only problem was the fact that they were purple.


I love bright colors, but purple does not match my red kitchen. After a little red spray paint and some printed labels, I was giddy with excitement over my adorably organized pantry.  Printing the words on graph paper added a little more sparkle. Using zip-ties, Jeremiah helped me to attach the little frames directly to the wire baskets.


Pin It
The difference is significant – and I must admit that I am more excited to cook dinner each night. I know where each ingredient is – and I am more aware of those items that have been hiding in the back of the deep pantry.  After adding the organizational elements, I was able to store twice as much stuff in the pantry. 


So, if you are feeling that you need more room, you may just need more organizational tools.  And this is definitely cheaper than tearing out walls and building new kitchens.

Pantry Makeover Cost:
ANTONIUS shelving unit frame  (IKEA) $9.99
4 Wire Baskets  (IKEA) $2.50 each
Added shelf (used wood from shelf removed) FREE
4 Vintage Frames (Michaels) $1.00 each
High Gloss Red Spray Paint (on-hand) FREE
Zip Ties to attach frames (On-Hand) FREE
Bag Organizer ($1.99 IKEA) On-Hand
Pot Lid Holder  (IKEA) On-Hand
2 Pop Can Organizer (Walmart) $5.97 each
                                                                               
                                                TOTAL                           $35.93

               
This project has also got me searching for more deep caverns that need organized – all it takes is a little creativity and a little help from IKEA (Read about my last IKEA trip here).

Thursday, September 15, 2011

How to have a successful IKEA trip!

Remember that feeling you would have the night before leaving on a big vacation? Or that excitement the night before going to a big amusement park?

Well, that's the feeling I have each time I am approaching a trip to IKEA.
                                           
For those who have not ventured into the world of IKEA, it is a home furnishings company from Sweeden. They provide lots of space saving ideas and options for lower costs. Basically, you do it all yourself - you browse, pick out, put the item on a cart in the warehouse, check out, load your car - all by yourself. Then, when you get home, you get to put it all together yourself.

Last Saturday, my best bud/next door neighbor decided to make the trip to the Atlanta IKEA. Weeks before, I start looking through the catalog and online at different things that I hope to buy. Their website comes complete with measurements. Jeremiah and I usually measure out what it is we hope to get, deciding if it will fit well in the space we have. Such was the case this trip - I hoped to buy storage shelves for my basement.

We decided on the GORM shelves...after measuring the basement, we decided 6 should do the job.
Get lots of sleep the night before (although this is always hard for me since I usually so excited!!!) The morning of the anticipated trip, I usually make sure that I have on comfortable shoes.

This particular trip, I made Chai tea for Ashlee and I to sip as we traveled.


I had my list prepared - including measurements and prices of all that I hoped to find. And I had a budget! This is like no other shopping experience. My friend Tracy once told me that she only takes cash so that she will not be tempted to shop off her list.

We also took Ashlee's mini-van, with the back seat taken out. You can see the size of the boxes listed on their website as well. Make sure you have a good way to haul your buys.

A few fun perks about IKEA - They have extremely cheap food! So we always plan to eat there! Who can beat $1 cinnamon rolls and 50 cent hot dogs....$1 ice cream cones...it goes on and on!

They have a new program called "IKEA FAMILY." Upon signing up for this, you will receive a free cone of frozen yogurt during your first visit. And each visit, you can get a free coffee or hot tea! This card also gives you special prices on certain featured items. Find out more about that here!

Also, if you pay with a debit card, you will receive a coupon for 1% of your purchases to use on future visits. I know, 1% isn't much, but I'll take a coupon any day! It seems I always use these to justify those impulse buys.

Ashlee and I had a blast on our trip! I love that the top floor of IKEA is full of display rooms. We made it a point to look in most of them. There are a few items I drool over each time...This TV unit, for instance. The gray/brown finish is my ideal!  See it pictured here in black.


And this awesome kitchen sink...with the wooden counter tops. They also have the Farmer's sink in a "double" sink.

Awesome patio table...with an awesome price. 2 chairs, a bench and a table! I'd never seen this before, but I will be keeping it in mind from now on.


This trip, I purchased some fabrics to cover my ottomans - I actually began sewing that very evening. I found the easy tutorial on Pinterest.
I added a small ruffle to the bottom! 1. Because I am still proud of my ruffle sewing technique (read about that here.) and 2. Because it covers up an uneven hem!


Remember how I mentioned that you have to load all your purchases yourself? Well, I had not thought about the fact that my traveling companion was very pregnant. Therefore, I did the lifting of all my shelves.

That's right, I stacked my 6 shelves proudly on my cart. Ashlee followed behind me in like with our buggie full of other purchases. I had chosen comfortable shoes, however, I had not considered that my shoes needed to have good traction. With all the weight of my wooden shelves, corners and turns proved to be quite difficult.
After check out, we decided to cash in our coupon for the free frozen yogurt. Pushing a heavy cart with slippery shoes is even more difficult with an ice cream cone in hand. Eventually, we made it down the elevator to the parking garage with the shelves in tact! And I did it all by myself with my ice cream cone! 

We are in the process of organizing the basement - here's our progress so far! More to come! Much more to organize!

If you would like to order a free catalog from IKEA, you can do so here.

What's your favorite IKEA impulse buy?