Showing posts with label Dollar Tree. Show all posts

Thursday, March 3, 2016

Painting Easter Eggs and Making a Flower Pot Wreath

I love to decorate with reds and mustards....but that makes my house seem a little dark. I would categorize my living room as a winter living room. The decor easily matches Fall, Christmas and Valentine seasons. But once spring has sprung, I start wishing for a lighter living room. Slowly, I am adding in more white and more greenery into my space, in hopes that it will look more spring-ish.


Last year, I had purchased a large plastic egg on Easter clearance for pennies. It was black and intended to be used as a chalkboard. Using some chalk paint (leftover from Nora's plastic kitchen remodel- which you can see here), I painted the egg white. I love that the chalk paint left the egg looking like  real eggshell. Some natural crackling even took place! Don't ask me how...ha. 


Using my tracing technique, I painted the words "He is Risen" onto the egg. We don't tell our children that the Easter bunny comes. But the eggs easily symbolize new life as the chick breaks out. We use the resurrection eggs to talk about the real meaning of Easter (make your own here). And this big white egg also helped to brighten up the area above my red hutch. 


The bunny garland is from my shop (@CoveyCreations on Instagram). 

And the wreath was a fun challenge. I had been given a wire wreath form by a friend. The Dollar Tree had these mini terracotta pots 3/$1. Using floral wire, I was able to tie the pots to the wreath form (thanks to those little holes in the bottom of the pots). 


I am obsessed with these Dollar Tree succulents, as well. I snatch up the natural looking ones each time I am in the store. They stayed in the pots without my having to glue or wire them into place, which means I can use them in another project later. The ribbon came from a Target clearance bin. 


All those little pots made the wreath quite heavy - and fragile. I really wanted to hang the wreath on my back door in the kitchen, but I was afraid of the mess it would make if it fell onto my tile floor. Crash...


But I like the nod to spring that it adds to the top of my hutch.

And PS...Nora is growing up too fast...


Friday, October 2, 2015

Kid-Friendly Pumpkins around my House

I love quick decor. I love cheap decor. I love kid friendly decor. My pumpkins around the house are great examples.


At a local produce stand, I picked up a bunch of small pumpkins. The large ones were so pretty and so tempting - but the small ones were cheap. Plus, with little ones, I am limited as to where I can sit these pumpkins without them being eaten or kicked.


This year, I am loving these little pumpkins nestled in with my milk glass collection.


It didn't require "undecorating" a space to make room for fall decor. It's out of the way yet still festive.


I also stacked a couple pumpkins in the living room. Turning the stacked books around let the pumpkin colors stand out.


(Wreath tutorial here. Antler tutorial here.)

When I bought my pumpkins, I also picked up a few stray stems on the ground. The produce stand let me have them for free. When I stacked pumpkins, I also pulled the stems off a few that I had purchased.


I let them dry out for a few days. I picked up a few small plastic pumpkins at the craft store. I love the look of the pumpkins, but the stems are always rather fake looking. Using hot glue, I attached my real stems to the fake pumpkins.


It might be my favorite fall decor this year. I love that it adds a little quirkiness to the plain plastic pumpkin.


(Wreath tutorial here.)

Using a paint pen, I added a few white dots to one of the plastic, re-stemmed pumpkins.


Stripes or other patterns would be adorable as well.


I had picked up some styrofoam pumpkins from the Dollar Tree a few years back (like these). I saw that they are still selling these pumpkins this year.


A steak knife easily removed the stem. I decoupaged wrapping paper and tissue paper on the three pumpkins. There was no way to get all the wrinkles out. So, I decided to embrace the look and not worry about it.


My pile of door knobs in the garage made excellent stems. I didn't glue them in place so that I can use the knobs for other projects.


Paper tags act as leaves, tied on with baker's twine.


Book pages cut into leaf shapes would also work.

And, I still love to pull out my fabric pumpkins.


I made five of these several years ago when Hudson was a baby. They have been wrestled, stacked, slobbered on and thrown. They get used as pillows, towers, seats and balls. And they still look like the day I made them.


You can see the original tutorial here (and see how little Hudson was!). They are super simple to make (and I hate to sew). I used felt for the stems. The real stems would also look cute on these pumpkins. I would just be worried about them stabbing the kids at this point.


Maybe someday I will switch out the felt stems.

For now, I am enjoying my quirky cheap pumpkins sprinkled around my house. And my kids are enjoying them too.


Thursday, May 28, 2015

Mossy Letters


It's no secret that I love the Dollar Tree. I am forever finding amazing deals on items...grocery, craft supplies, party decor, etc.  The other night, I spotted these moss covered "rocks." I didn't know what I would do with them yet, but I loved the idea of them. They were in the fake flower section right next to the fake fruit.

I enjoy plants around my house - bringing the outdoors in. I do not have a green thumb though. These mossy "rocks" seemed like a cute thing to stick in a white dish, and I didn't have to worry about them dying.

Today, I decided to try covering a wooden letters with the moss. Since they were made of foam, I just cut them in half.


This allowed the rocks to lay flat. It also made the two packs of four rocks each more than enough.


Hot glue held the foam on the wood.

Using a black sharpie, I colored in any white Styrofoam that was still visible.


I am working on a collage of items for my hallway. Several items have green in them. This should look great with the ensemble.


But for now, this C found a temporary home in my kitchen.


Since I had the letter on hand, this super simple project cost me $2. I love cheap yet satisfying crafts.
  And I loved finding a use for my latest Dollar Tree purchase.


Saturday, March 14, 2015

DIY Resurrection Eggs

I am always looking for activities for Hudson that will reinforce Biblical truths. The older he gets, the more I am able to incorporate into our day. With Easter approaching, I knew that I wanted to try to use the Resurrection Eggs. You can purchase a set, but I decided that I could probably make my own with items around the house.


I purchased plastic Easter eggs from the dollar store. They came in a pack of 18. I saved an empty egg carton to hold the eggs. Back in late elementary school, I learned the power of fingernail polish remover. I remember having the cutest white shoes to wear with my Easter dress. But the first day I wore them, I got black scuff marks up the side. My mom showed me how to remove those scuff marks with fingernail polish remover. Since then, whenever I am hoping to remove some painted or stamped on image, I try this miraculous stinky liquid first.


For the egg carton, I simply rubbed a cotton ball that had a little polish remover on it over the ink. And, I am happy to report that it pretty much removed all of the stamped images on my egg carton.


I selected twelve colored eggs and started gathering my items. I will be using the printable version of the resurrection eggs found here.

I numbered each egg with a regular black permanent marker.


Here are the items I found around the house.


1.  Palm Branch (leaf) – Jesus was celebrated when he entered the city.
2.  Bread (Gold Fish) – Symbolizes the Last Supper. We might even drink a little grape juice when we talk about this egg.
3.  Silver Coins (3 dimes = 30 cents) – Judas took a bribe to betray Jesus.
4.  Purple Cloth & Thorns (leftover cloth and thorns from the yard) – Jesus was mocked by the soldiers.
5.  Whip (some string) – Symbolizes the beating that Jesus endured.
6.  Cross (pieces of a Popsicle stick glued together) – Jesus carried his cross.
7.  Nails – (3) Shows the pain Jesus went through as he was nailed to his cross.
8.  Sign (I wrote “King of the Jews” on a small wooden tag, but you could use paper)  - The sign that was nailed above Jesus saying he was the King of Jews.
9.  Spear and Sponge (piece of a Popsicle stick with some electrical tape and a cut-off corner of a dish sponge) – Signifies the proof of Jesus’ death and his last moments.
10.  Spices (cinnamon and cloves) – Jewish people were traditionally buried with spices.
11.  Rock – Symbolizes the stone that was moved from Jesus’ tomb.
12.  Nothing – Shows the empty tomb.  Jesus has risen.
I am so excited to begin this tradition with my kids. In future years, I might even let them help me gather items to fill our eggs.

I made a little sleeve for our egg carton from wrapping paper and I plan to tuck the printed descriptions inside this sleeve.


PS. Whenever I see an empty Easter egg, I am always brought back to this touching story about a little boy with an empty Easter egg.

What activities do you use to help prepare your family's hearts for Easter?

Tuesday, December 10, 2013

I wanted that tree!!

Who knew that a piece of fabric could put me on a mini emotional roller coaster. Before you go on this ride with me, I'll share the end result.


It just took a little bit for me to get things this way. Here's what happened...

About a month ago, while reading some blogs, I came across a picture of a fabulous couple of yards of fabric from IKEA of a Christmas tree.  I fell in love. (See what I saw here...) But, IKEA doesn't sell this fabric anymore.

However, upon further searching and googling (I was hoping something similar might exist) I realized that IKEA had a different type of canvas tree this year. It was $12.99 for the entire thing...and it glowed in the dark! But there was just one problem. I had gone to IKEA the week before. And another trip to Atlanta was not in my immediate future (especially not another trip before Christmas).

Thank goodness my sister was going though! But the day she was going to IKEA, they removed the tree from their website. However, there were still a few in stock! She picked up the magical canvas tree for me!

As soon as she brought it by the house, I took it out of its packaging and into a dark room. Yep! It glowed in the dark!


After picking up some 5 foot PVC pipes, the tree was hung in my hallway.


I had loved the original idea of making this tree into an advent calendar, but I wasn't quite ready to do anything permanent yet. So, like any good hoarder of craft supplies, I raided the guest room closet to see what I had on hand.


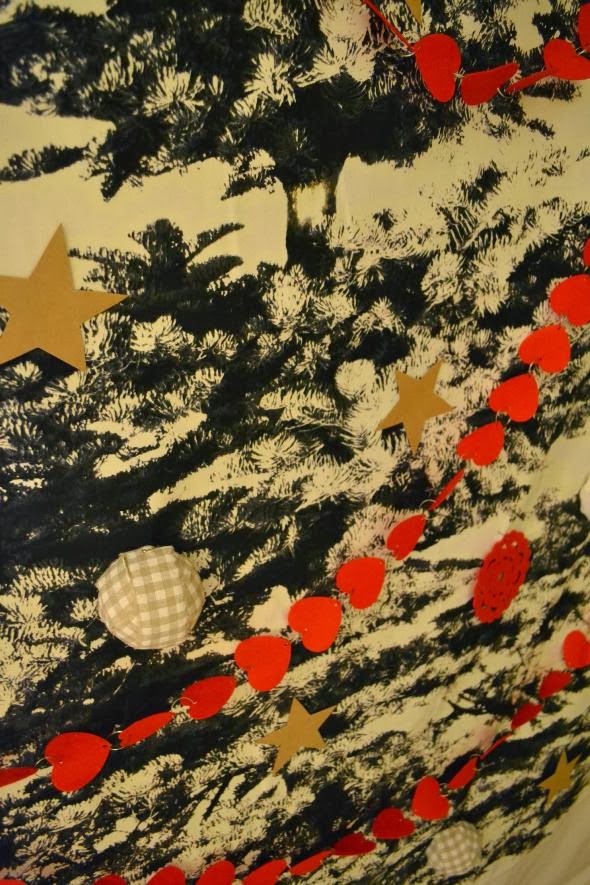
I also remembered a felt heart garland I had picked up at the Dollar Tree back in February. Using safety pins, I attached the garland to the tree.


Next, I cut some styrofoam balls in half and wrapped them in strips of fabric. These also were attached to the tree with safety pins. Some stars cut out of brown cardstock got taped into place.


 Dollar Tree also recently had packs of felt coasters. A set of four red ones made adorable ornaments.


Last but not least, I needed a topper. I tried a few different things, but in the end, I settled for a flag cut from cardstock.


It seemed different, yet fitting since the tree had a very long skinny top.


I am enjoying my festive little hallway. And I think it pairs nicely with my gift box wreath. Even if I had not had the decorations on hand, this project still would have cost me less than $20.

I must admit that there was one more mishap with this little tree. As I was snapping the last photo, the whole thing came crashing down. Apparently, one strand of twine was not enough to hold this beauty. My husband helped me secure it more permanently.


So, a word to the wise...if you hang something this way, use a couple strands of twine!

And, it seems there are a few of these trees on Ebay and Amazon...or you may find one on the shelves at an IKEA store. I am glad that my sister helped me to snag one! It's a fun addition to my Christmas decor.