Showing posts with label wreath. Show all posts

Sunday, October 16, 2016

Easy DIY Cotton Wreath

Sunday afternoons always feel like the perfect time for a project. I get this sudden urge to bake or craft or re-decorate something. Today, I decided to try to make a cotton wreath with supplies on hand. And it worked!


I re-use grapevine wreaths often. Hot glued items can be easily pulled off.

After locating a wreath, my hot glue gun, some cotton balls, and a few brown paper bags, I was ready to tackle this idea.


Since real cotton pods look more like a cluster, I decided to hot glue two cotton balls together.


After cutting the brown paper bags (I used regular lunch sacks) into approximately 3 inch squares, I folded those squares into quarters.


Once I could clearly see the 4 creased lines, I used those lines to help me cut 4 petal shapes. I tried to make them all different in width and size.


This helped the pods look more natural rather than all identical.

Using my hot glue gun, I ran a line of glue down each petal and then pressed them down around the cotton ball cluster. I tried to leave the crease between the two cotton balls facing upwards.


When I glued the pods onto the wreath, I tried to tuck some under branches. I also applied the glue on the sides of most of the pods, so that the brown paper bag piece wasn't hidden.


The entire project took less than 30 minutes. Even if you didn't have the supplies on hand, this wreath would cost less than $5 to make.

I am happy to add this to my fall decor.


These pods could also be hot glued onto branches and placed in a vase or jar for a centerpiece. 

Tuesday, March 22, 2016

Easter Egg Door Hanger

Easter is super early this year. I needed something for my front door that was spring-ish, Eastery, and quick to make. And that's where this idea came from.


I have really enjoyed my large painted Easter egg this year. It was super easy to make. And I have been able to use the egg in my home decor as well as at our last MOPS meeting.


I had originally thought about asking my husband to make me a wooden egg sign, but often when I get an idea in my head, I want to make it right away. He was at work, and so I started searching my house for supplies on hand. I borrowed a white piece of cardboard from my neighbor and cut the egg shape from that. White foam board from the Dollar Store would also work wonderfully.


Using my tracing method, I wrote the words that seem to me on my heart recently. (And it transferred so easily to the cardboard)


I love that the weather has been warmer and that my kids love to go outside. Nora wakes up many mornings asking for her shoes and to go "dice" (which I think is her word for outside).


And Hudson is super curious these days. Asking lots of questions and gathering all the information he can.


Although these days can seem long and daunting, and the questions can seem endless, I am trying to remember that each question is an opportunity to teach these kids about Jesus.


Sure, we hide eggs and eat Easter candy, but I want them to know that Jesus is what Easter is all about. (See my little Easter Story Box idea here).


I pray that Jesus is a very present part of our day.

And I pray that they will someday know Jesus as their Savior. Because, it is all because of Jesus that I can face tomorrow!


Because He lives, I can face tomorrow
Because He lives, every fear is gone
I know He holds my life, my future in His hands

Because He lives


PS. Since the cardboard is super lightweight, I secured this to the door with a couple command strips.


Thursday, March 3, 2016

Painting Easter Eggs and Making a Flower Pot Wreath

I love to decorate with reds and mustards....but that makes my house seem a little dark. I would categorize my living room as a winter living room. The decor easily matches Fall, Christmas and Valentine seasons. But once spring has sprung, I start wishing for a lighter living room. Slowly, I am adding in more white and more greenery into my space, in hopes that it will look more spring-ish.


Last year, I had purchased a large plastic egg on Easter clearance for pennies. It was black and intended to be used as a chalkboard. Using some chalk paint (leftover from Nora's plastic kitchen remodel- which you can see here), I painted the egg white. I love that the chalk paint left the egg looking like  real eggshell. Some natural crackling even took place! Don't ask me how...ha. 


Using my tracing technique, I painted the words "He is Risen" onto the egg. We don't tell our children that the Easter bunny comes. But the eggs easily symbolize new life as the chick breaks out. We use the resurrection eggs to talk about the real meaning of Easter (make your own here). And this big white egg also helped to brighten up the area above my red hutch. 


The bunny garland is from my shop (@CoveyCreations on Instagram). 

And the wreath was a fun challenge. I had been given a wire wreath form by a friend. The Dollar Tree had these mini terracotta pots 3/$1. Using floral wire, I was able to tie the pots to the wreath form (thanks to those little holes in the bottom of the pots). 


I am obsessed with these Dollar Tree succulents, as well. I snatch up the natural looking ones each time I am in the store. They stayed in the pots without my having to glue or wire them into place, which means I can use them in another project later. The ribbon came from a Target clearance bin. 


All those little pots made the wreath quite heavy - and fragile. I really wanted to hang the wreath on my back door in the kitchen, but I was afraid of the mess it would make if it fell onto my tile floor. Crash...


But I like the nod to spring that it adds to the top of my hutch.

And PS...Nora is growing up too fast...


Saturday, January 16, 2016

New Year's Wreath/ Valentine Wreath

I love the Christmas clearance sections! It's almost just as thrilling as Christmas shipping. I love to look through the piles and try to think of ways I can use these cheap prizes for gifts next year. And sometimes, the decor isn't even "Christmas-only."  The wreath on my front door came from my Christmas clearance shopping this year.


I realize this is very New-Year's-Eve-ish! But I am just now getting around to posting this quick idea.

I picked up several strands of the sparkly tinsel garland in the Christmas clearance section. Three covered my wreath fully.


After wrapping the tinsel around a Styrofoam wreath form, I attached a sparkly gold bow with wire that was also part of the Christmas clearance. I think it was meant to be a gift topper.


I am sure that there are still some strands of red and silver out there in some clearance section. This would make an adorable valentine wreath!

The tinsel stayed in place without my having to glue it to the wreath. That means, I can use this wreath form for another project!


And the entire wreath cost me just a few dollars!

Tuesday, December 15, 2015

Paint Stick Stars (MOPS Craft)

You might say I am on a mission to find cheap, cute, easy to duplicate crafts for our MOPS meetings. And, this Christmas project ended up costing just a few pennies, thanks to some generous businesses and a few supplies already on hand. 


Two local hardware stores donated the sum of 1,000 paint sticks. 


That meant that each mom could have 10 sticks...she could either make two small stars or one large star. 


We hot-glued the paint sticks together. For the larger star, two paint sticks made up each side. 


Twine, fabric, pine-cones, bits of greenery and floral wire were available for decorating. 


I always love to hear the conversations that begin around the hot-glue stations. 


It was easy for me to find lots of places for my cheap stars. 


One spray painted black sits beside a lantern on my table. 


Another star, with the business name exposed, sits on top of my hutch. 


After wrapping some twine around another small star, it made the perfect rustic tree-topper for my son's room. 


While I had my pile of example stars in the kitchen, another idea occurred to me. 


Two small stars make a cute snowflake wreath for my backdoor. 


The lightness of the paint sticks make them easy to glue together, easy to hang, and cheap to pick up. In fact, I will be posting another paint stick craft in a few days. 

Many hardware stores will give you a few paint sticks if you ask...start a collection and let me know what ideas you come up with! Used one - with paint splatters - would even make a cute rustic star. 


Wednesday, December 9, 2015

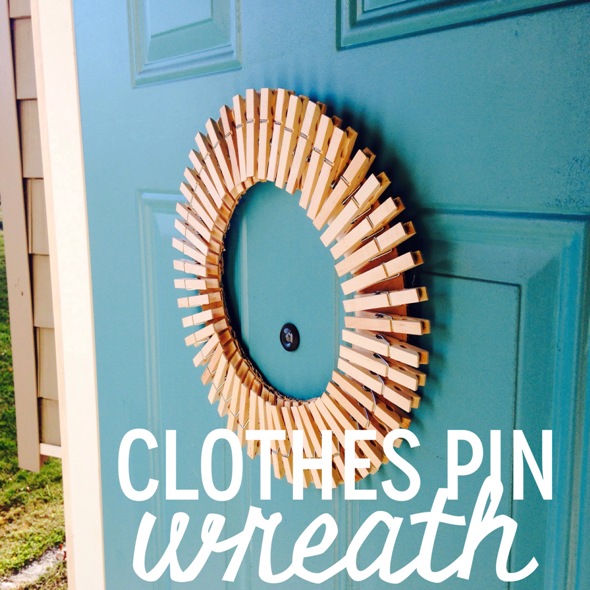
Clothespin Wreath at MOPS

At our MOPS meeting right before Thanksgiving, we needed a quick craft to add at the last minute. Using some cardboard circles (normally used to go under cakes) and some clothespins, the moms were able to take home a wreath that could be used for several different occasions.


The hardest part of the this quick craft was locating 3,000 clothespins. Normally, I plan for 100 ladies. But since this was for our morning group, I only had to plan for 60. Three Walmarts and a Dollar Tree later...we had enough clothespins.


Using a plate, we traced the inside circle of the wreath. Once the cardboard center was removed, each mom grabbed 50 clothespins. Our cardboard circles were 12". These cake circles make excellent wreath forms. We also used them for this wreath last year.


Some found it easiest to clip their clothespins around the outside of the circle to help determine the spacing needed.


Hot glue was applied to from the handle tip the metal clip on each clothes pin.


Working around the circle, the handle tips of each clothespin were lined up along the center edge of the wreath.


Since it was the week of Thanksgiving, some moms used their wreaths to record what family members were thankful for. One mom even spray painted her wreath to add some color.


Then, once Christmas cards begin to arrive, it becomes a cute way to display those holiday greetings.


Or it can always just be a cute wreath on a door...or in your laundry room. You could even display Birthday cards with it.


I love an easy, versatile project.